2/ What are its features?
- Metal chassis and a "professional" feel
- Continuous autofocusing
- Step-less shutter speeds from 1/4000 - 30 seconds
- Manual film advance and rewind, or detachable 5 frames-per-second motor drive
- Silicon photocell metering (Centre-weighted averaging and 5.5mm Spot metering)
- Spot-metering correction for highlights and shadows
- Four exposure modes (Programmed auto-exposure, Aperture-priority auto-exposure, Shutter-priority auto-exposure and Metered-manual exposure)
- 1/250 second flash sync, off the film flash metering, metered fill flash and PC socket
- Comprehensive top panel and viewfinder LCD displays
- Depth of field preview
- Multiple-exposure capability
- Self-timer
- DX coding
- Uses cheap and convenient size AA batteries
- Interchangeable viewfinder screens
- Automatic viewfinder illumination
- Variable eyepiece dioptre correction
- Viewfinder-blind
- A detachable program back which provides;
- An intervalomter
- Concealed imprinting of exposure data
- 3 user-programmable exposure curves
- Auto-bracketing of up to 9 exposures
- 8-reading spot meter memory
- Numerous accessories
It certainly has a classical professional feel about it, with great ergonomics and solid construction. Most controls are easy to learn and situated where you need them, even if you have large hands.
The 9000 has now been in hard work for over 10 years with few problems (see the section on buying a used 9000). The Minolta Mailing List has numerous stories of 9000 cameras surviving incredible abuse. However, although the 9000 is one of Minolta's most rugged cameras, it is still just a camera, and it won't tolerate routine exposure to harsh bangs, moisture or dirt.
The program changes from wide to standard at focal length of 35mm, and from standard to tele at 105mm. (You can see the shutter speed and aperture change as you alter the focal length of a zoom lens). The combination of aperture and shutter speed dictated by the program can be adjusted while maintaining the same overall exposure by using the shutter or aperture up/down control. However this "program shift" adjustment has no memory, and your adjustments vanish 10 seconds after you remove your finger from the shutter release button.
Meanwhile the main mirror has been swinging upward. When the main mirror has reached the top of its swing, it releases a mechanical latch on the shutter's opening blade set. The opening blade set crosses the film in approximately 1/300 second. An electronic timer then determines when an electromagnet releases the shutter's closing blade set to finish the exposure. The mirror and diaphragm are then returned to their focusing positions.
The time lag between pressing the shutter release and the beginning of the exposure is 80 to 160 milliseconds (average for contemporary cameras). Apparently part of this time lag is intentionally introduced by a time delay circuit, to allow the exposure metering circuitry long enough to produce a stable reading of the scene. The vibration and noise produced during shutter release are above average for contemporary cameras.
To detach the battery packs from the MD-90 motor, look for a sliding lever at the right of your battery pack where it joins the motor. Slide this lever and pull the right side of the battery pack down and to the left away from the motor.
There is also a winder available for the 9000, the AW-90. This is substantialy lighter than the MD-90 (about the size of the MD-90 without its battery pack). It has a maximum speed of 2 frames per second. It has no motor-driven rewind or vertical shutter release button. It is powered by 4 AA batteries.
Comments about the Program Back Super-90 on the Minolta Mailing List are very favourable, but there are a few warnings;
Four flashes are dedicated to the 9000 body; 1800AF, 2800AF, 4000AF and the 1200AF ringflash. All provide direct flash metering (through the lens off the film) and automatic fill flash.
The 1200AF is a ringflash (surrounds the lens) which provides shadow-free lighting for macro photography. It has 4 focus lights and 4 individually selectable flash tubes.
The 1800AF is a budget flash at the bottom of the range. It provides TTL metering and autofocus illumination, but lacks features found on the 2800AF and 4000AF such as a test button or an accessory connector plug. It has only one power setting.
The 2800AF is next up in the range. It has 2 output settings, and has a flash coverage equivalent to a 35mm lens.
The 4000AF is the top of the range of flashes dedicated to the Maxxum 9000. It has 6 output settings, and the flash head zooms to provide automatic adjustment of flash coverage for lenses from 28 to 70mm. The head of the 4000AF can be tilted / swivelled, and when set at its lowest power setting the 4000AF's recycling interval is short enough to allow the MD-90 motor-drive to be used at 2 fps.
Minolta quotes the ISO 100 guide numbers as; 18 meters for the 1800AF, 28 meters for the 2800AF, and 40 metres for the 4000AF.
The 1800AF, 2800AF and 4000AF incorporate an autofocus illuminator, which is activated when the ambient light level falls below about EV 2. The autofocus illuminator projects a pattern of near-infa red (but still visible) light onto the subject to allow autofocusing. The operating range is between 1 and 5 meters, and it seems to work best with lenses faster than about f/4.5.
The 1800AF, 2800AF and 4000AF can be used in any of the 9000's 4 exposure modes. The following explanation applies to the 4000AF;
Duncan James has a method of adjusting flash exposure independent of ambient light exposure."Use the camera in Manual and meter as usual. Then, use the ISO setting as you would on a
camera without exposure compensation - increase the film speed setting to
reduce exposure, or lower the setting to increase it. All this assumes that
you don't change the aperture/shutter speed settings. The camera uses the
ISO setting to determine all aspects exposure including flash, so if all
other settings stay the same, only the flash power varies. Manual is the
most convenient mode for this. In theory, it would be possible to do the
same thing in other modes by using the AEL button, but it would involve so
much simultaneous button pressing that you'd virtually have to be a concert
pianist to do it".
In manual mode you can of course also alter the flash ratio by altering the power setting on the flash, with reference to the coverage distance displayed on the flash LCD panel.
Please take the time to send in corrections or new information. I want the details of this FAQ to be rock solid. This FAQ will be updated every 6 months or so.
The author wishes to acknowledge the help of all 9000 users on the Minolta Mailing List, especially those who often discuss Maxxum 9000 issues. Thanks to Duncan James for corrections and helpful advice.
Thanks to Craig Huxely for having this FAQ on his Minolta Users' Group web site. A very good site for all things Minolta.
Thanks to Magnus Gustafasen for having this FAQ on his Maxxum-9000 home page.
This document will be copyright 1997 by Cris Print. You may copy and distribute this FAQ without charge, provided it is reproduced in its entirety, and provided it is not used for direct commercial advantage.
The author has endeavoured to ensure all information in this FAQ is accurate. However, the author does not assume any responsibility for losses and damages resulting from the use of the information in this FAQ. You use the information in this FAQ at your own risk.
Cris Print, November 1997
3/ What is the 9000 like to work with?
The 9000 was built as a no-nonsense tool for professional photographers.
4/ How is it built?
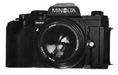
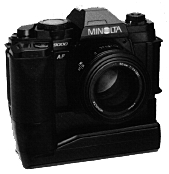
The 9000 camera body, with batteries but without a lens weighs 645 g and measures 53 x 92 x 139 mm. When you attach the optional MD-90 motordrive the total weight is 1235 g, and the measurements are 53 x 152 x 139 mm. The main body chassis, mirror box and front plate are die-cast aluminium-alloy. The bottom cover is stamped brass. The lens mount is stainless steel and is securely attached to the aluminium chassis with 6 screws. The remaining cover panels are polycarbonate plastic. Inside, wires have been eliminated where possible by the use of over 50 gold plated pressure contacts at the edges of the circuit boards. The camera contains nine gold-plated switches. The film advance system is of hard steel, with ball bearings and bronze bushes, however the coupling between the wind gears and film drive sprocket is made of plastic. The shutter is a vertical-transverse focal plane type. The shutter blades are made of aluminium alloy, while the actuating arms are titanium.
5/ I've just bought a 9000, how do I use the it's basic functions?
6/ What is the 9000's autofocus like to use?
The 9000 provides continuous autofocusing - ie. while your finger is touching the shutter-release button the autofocus continually tracks whatever is in the centre of the viewfinder, and the shutter can be released at any time. With the MD-90 motor-drive attached, you also have the option of focus-priority shutter release, where the shutter will not release until focus is locked on a subject. At any time autofocus can be disabled and the 9000 focused manually. To assist focusing, a green LED at the lower left of the viewfinder lights when the subject in the centre of the viewfinder is sharply in focus. If the subject is not in focus, two red LED arrows indicate which direction the focusing ring on the lens must be moved to bring the subject into focus.
7/ How does the 9000's autofocus compare to that of newer Maxxums?
The 9000 represents Minolta's first generation of autofocus cameras - it has a single, horizontal autofocus sensor. In practice the 9000 autofocuses well in almost all situations and is very accurate. However it is more bothered by low light, low contrast or fast moving subjects than newer Maxxums. The 9000's autofocus is also slower than that of newer Maxxums, but for most users the speed is still quite tolerable. (For example, the 9000's autofocus speed may become a problem if you do mostly sports photography, but you will find it easily fast enough to follow your child playing with your dog). A good trick to greatly increase the 9000's autofocus speed is to use lenses which have small, light, rear focusing elements (for example the 28 to 135 f/4-4.5 zoom). The 9000 also lacks the predictive autofocusing of some newer Maxxums.
8/ Can the 9000 autofocus in low light?
Not quite as well as later Maxxums. Minolta quotes the autofocus working sensitivity as EV 2 to 19 at ISO 100. A review of the 9000 at time of its release by Popular Photography magazine found the autofocus sensitivity to be EV 3 to EV 18. The same review found that the 9000's autofocus required 0.8 EV contrast in average light (EV 10 at ISO 100), and 2.4 EV contrast at the low light limit (EV 3 at ISO 100). Of course, the ability to autofocus in low light depends on the maximum aperture of your lens. For instance my 9000 autofocuses well at early dusk with the standard 50mm f/1.7 lens, but sometimes has problems in bright sunlight with a 500mm f/8 lens. The autofocus-illuminator unit (in AF flashes or as a separate accessory) projects a near-infa red wavelength pattern to allow the 9000 to focus in the dark.
9/ How does the 9000's autofocus work?
Autofocus is by "through the lens phase detection". The following explanation is simplified from two articles which appeared in Popular Photography magazine in 1985. Light from the centre of the image passes through the semi-transparent main mirror, and strikes a piggy-back mirror. Light is reflected from a small polished area in the centre of the piggyback mirror to the focus-detection module. Here lenses split the image into two beams (left and right), both of which strike a horizontal array of charge-coupled devices. When the image is in focus on the film, the two beams will each strike a pre-determined position on the array of charged coupled devices. If the image is shifted out of focus, the two beams will move across the array of charged coupled devices in opposite directions. Electrical signals from the charged coupled devices are used to direct the autofocus motor, and to light the appropriate focus symbols in the viewfinder.
10/ What are the 9000's metering modes?
The 9000 has 4 metering modes, selected by turning a dial on the rewind crank. The metered exposure settings can be locked by maintaining pressure on the autoexposure lock key, situated under your thumb on the back panel of the camera. The metering indicator in the viewfinder blinks if the ambient light level is outside the meter's range of accuracy.
11/ How does the metering work?
Light from the image passes through the lens and the semi-transparent main mirror, and strikes a piggy-back mirror (the centre of which is also used to reflect light to the focus-detection module). A grooved frosted surface which covers most of the piggyback mirror reflects light from the image to a compound silicon photocell. The central portion of the photocell is used for spot metering, while the entire photocell is used for centre-weighted average metering. The photocell also receives light from a small aspheric plastic lens. This collects light from the film plane to allow metering of flash exposures.
12/ What are the 9000's exposure modes?
The 9000 has 4 exposure modes, which are selected by turning the large ring which surrounds the LCD display on the top panel. In any mode, up to +/- 4 stops of exposure compensation can be set by moving the shutter up/down control while pressing the exposure adjustment (+/-) key.
13/ What happens when you press the shutter-release?
The following explanation is simplified from articles which appeared in Popular Photography magazine in 1985. Everything that occurs after the shutter is released is spring-driven. When the shutter release button is pressed, electromagnets release the main mirror and the diaphragm actuator. As the diaphragm actuator moves, it turns a chopper wheel which spins within an infa-red motion-detection module. Information from this module is used to count the number of fractions of an f-stop the diaphragm actuator has moved. When the required f-stop has been reached, an electromagnet drops a latch onto a ratchet wheel to halt the diaphragm motion.
14/ How do I use the depth of field preview?
The electronic depth of field preview button on the front right of the camera operates in all exposure modes. The preview switch is situated below the shutter release button, and folds away when not in use. Pressing it half way down and releasing it stops the diaphragm down to the taking aperture and locks it. In addition a "F" blinks in the viewfinder, and the autofocus is locked. The depth of field preview is cancelled by releasing the shutter, or pressing the preview switch all the way down and releasing it. The preview switch will not operate if the film has not been advanced. The depth of field preview is quieter on the 9000 than on later Maxxums. In addition the depth of field preview on the 9000 is lockable, while on later Maxxums depth of field preview only operates while you continue to press the depth of field preview button.
15/ Does the 9000 allow multiple exposures?
You can take as many exposures as you wish on the one frame, by holding in a small button beside the autoexposure lock key each time you wind the film.
16/ Is there a provision for near- or far-sighted users?
The eyepiece adjustment dial allows the from -3 to +1 dioptres adjustment of the eyepiece lens. For further adjustment eyepiece correction lenses were available which snap onto the eyepiece frame. The viewing area is approximately 94% of the film frame.
17/ What does the MD-90 motor drive do?
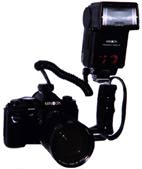
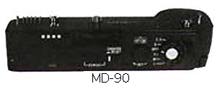 The MD-90 motor drive slots onto the base of the 9000, and provides 2, 3, 4, or 5 frames per second firing, in addition to single frame advance. When using the MD-90 motor-drive for sequential firing, autofocusing ends with the first shot in the series. With the MD-90 motor-drive, the shutter mechanism is fast enough to allow 5 frames per second film advance only if the shutter speed is 1/125 second or faster. The MD-90 rewinds a 36 exposure film in just under 7 seconds, leaving about 75mm of leader sticking out of the film cartridge. The MD-90 also provides a vertical format shutter-release button on its bottom right hand corner. As an option for left-handers, an MD-90 with the vertical shutter-release button on the lower left corner was also available. The MD-90 came with either an AA-size battery pack (BP90), or with a rechargeable Ni-Cad battery pack (NP-90). The BP-90 is good for bushwalking / safari's when you do not have access to mains electricity for charging the NP-90. The NP-90 is reputed to allow slightly faster winding than the BP-90. For an idea of the overall size of the 9000 with MD-90 and NP-90, see the photo of the Maxxum 9000 mounted on an MD-90 above.
18/ What do the optional program backs do?
19/ What focusing screens are there?
Five focussing screens were made for the 9000;
20/ What batteries does the Maxxum 9000 use?
Two AA batteries fit into a removable compartment inside the right hand side of the body. Either Alkaline-Magnesium, Nickel-Cadmuim or Carbon-Zinc batteries can be used. Even when the camera is switched off it draws a small amount of current (about 0.01mA). The LCD's on the 9000's top panel blink when battery power is getting low. The 9000 will not operate without batteries. Exposure adjustment settings, film speed, and manual exposure settings are stored in the 9000's memory when the camera is switched off.
21/ What flash functions does the 9000 provide?
Several flash units can be mounted on the accessory-shoe above the viewfinder, on the control grip (CG-100) accessory, or on a remote cable. A PC-type sync terminal is also provided for flash units that do not fit in the 9000's accessory-shoe.
Note that the 9000's exposure compensation function alters the total (flash + ambient light) exposure - it does not alter the balance between flash and ambient light exposure.
However, if your want a little more automation, the 9000 provides a neat way to automatically expose the ambient-lit background as much as is possible without overexposing your flash-lit subject. To use this automatic "slow shutter sync" mode, press the auto-exposure lock key as you release the shutter. This will correctly expose your main subject (which will be lit by a combination of flash and ambient light), while effectively underexposing the background (lit by ambient light alone) by 1 stop. One use of this function is to produce deep blue skies behind a correctly exposed flash-lit subject. (Note that there is one limitation - you should ensure that the shutter speed required to correctly expose the background (with the flash turned off) is equal to or slower than 1/125 second).
22/ What flash accessories are there?
23/ What other flashes work with the 9000?
The PX series all work with the 9000 to provide TTL flash metering, but provide no autofocus assistance. The X series will operate with the 9000 without TTL metering. Most later flash units designed for Maxxum cameras will operate in TTL mode with the 9000, but the FS-1200 adaptor is required to connect these units to the 9000's accessory-shoe, and some functions are lost. For instance the 5400HS flash used on a 9000 with the adaptor loses high speed sync, power zoom, viewfinder indication of a good exposure and AF illuminator.
24/ What other accessories were made for the 9000?
25/ What do I look for when buying a used 9000?
A used 9000 body should not cost much more than US$300 / Australian$600. (US$450 with an MD-90 motor drive). When new in 1985 the list price for the body was US$670 / Australian$1250.
The Minolta Mailing List mentions some problems that may occasionally occur;
Take some test photos with the camera before buying!
26/ I'm thinking of buying a 9000 but also looking at other cameras - Does the 9000 have any disadvantages I should know about?
The 9000 does not have many real disadvantages - most items on the list below will only be of interest to specialists;
27/ What are the other models in the Maxxum x000 series like?
28/ Footnotes
Please email any new information / comments / corrections to Cris Print, print@wehi.edu.au
29/ History
Version-1.1 February 1997
Version-1.2 April 1997
Version-1.3 April 1997
Version-1.4 November 1997