Date: Mon, 12 Oct 1998 21:18:54 -0500
From: Nick Danger (ndang@eritas.org)
Subject: Re: IR-1n set
I suppose I could dig out my instructions for the thing, but it doesn't seem like a good use of time or bandwidth -- there just isn't that much to using the IR-1n. Is there something specific you need to know? If not, here's a short course in operating it:
- Mount the receiver to the camera, either by placing it in the accessory shoe or connecting it to the little L-shaped bracket that stows in the lid of the case. (The accessory foot of the receiver slides into the cutout on the short end of the L, and you mount the long end between the camera body and whatever tripod or clamp you're using to hold the camera.)
- Plug the receiver's cord into the camera's remote socket, being careful not to lose the little socket cap (unless you have a 9000 with its un-losable sliding cover.) Plug the other end of the cord into the PC socket on the side of the receiver. (Yes, this is a standard flash-type PC plug, so you can use PC cord extensions if the unit's remote cord isn't long enough for some oddball setup.)
- Turn on the receiver by sliding its power switch from "Off" to "S" or "C" (more about those in a second.) Once it's powered on, you can test the battery (9v rectangular) by pressing the B.C. button; if the battery is okay, the white light above the receptor should glow brightly. The receiver's foot swivels, so turn it so it points in approximately the direction from which you'll be triggering it.
- Set the channel switch on the receiver to whichever channel you want to use: 1, 2 or 3. Make sure the channel switch on the transmitter is set to the same channel. (Normally you can use any channel you want, unless some other photographer is using an IR remote release in the same area. If you have three different receivers and cameras to go with them, you can use the channel feature to select which unit you want to fire.)
- Decide whether you'll be wanting to shoot single frames or continuous sequences -- that's what the "S" and "C" positions on the power switch are for.
- For single shots, set the camera's motor wind control AND the switch on the IR receiver to "S." In this mode, pressing the trip button on the transmitter will close and re-open the shutter-release contact, causing the camera to shoot one frame. The white light above the receptor will flash once to give you visual confirmation that the camera did trigger.
- For a sequence of shots, set the camera's motor wind control AND the receiver switch to "C." In this mode, pressing the trip button will close the shutter release contact and *keep it closed.* With the camera's advance mode set to "C," this will cause the camera to keep firing continuously *until you press the trip button on the release AGAIN.* The white light will flash continuously while the camera is firing to remind you that you're burning film. Incidentally, if you forget to terminate a continuous sequence by pressing the trip button a second time, the receiver's battery will get depleted fairly quickly (not to mention the same thing happening to your film!)
- Before you leave your remote setup, don't forget to set up the camera itself: check the composition, choose the exposure or exposure mode you want to use, and focus on the area where you expect the action. Fortunately or unfortunately, the IR-1n does NOT trigger the camera's AF system; the focus point will stay where you've set it for every frame you shoot remotely. (Some people may be disappointed that it won't focus before releasing or do "trap focus," but I like the fact that I don't have to worry about the camera deciding to refocus itself inappropriately when I'm not around to supervise it.)
- Now that you've got the receiver and camera set up, it's a good idea to test the system to make sure the receiver is "seeing" the signal from the transmitter. Temporarily unplug the cord from the receiver, make sure the transmitter is turned on and its ready light is lit, and fire the transmitter a few times. The white light on the receiver should flash to confirm that it's receiving the signal. If everything's OK, reconnect the cord and go away, leaving the remote to do its work. A fresh 9v battery in the receiver will keep it "on standby" for several hours at least... but if you need for it to work for days on end, you'll need to rig up some kind of longer-lasting power source.
Incidentally, the transmitter part of the unit is actually a small electronic flash unit with an IR lens over the tube. It's surprisingly powerful; in dimly-lit indoor conditions, it will fire the receiver from hundreds of feet away even if you don't have it pointed directly at the receiver (provided there are enough walls and other surfaces to scatter the IR.) Outdoors, in brighter light, or at greater distances, you may have to be more careful about aiming the transmitter.
The Maxxum 9xi will accept the BP-9xi battery pack. This is a battery pack that connects to the bottom of the camera, replacing the 2CR5 internal battery with 4 AA batteries. There is currently some debate as to whether or not you can use lithium batteries (as opposied to alkaline) in the BP-9xi. Minolta warns you not to. This pack does not offer an additional shutter release button.
The 700si/800si's extended battery pack (called the VC-700) doubles as a vertical grip. If you rotate the camera 90 degrees, you still have the same layout of buttons (shutter release, AEL, etc). Minolta advise you not to use AA-sized Lithium batteries in the VC-700 grip (but see MML quote below), but it does give you the choice of fitting four AA batteries instead of the 2CR5 - if you are likely to use the camera a lot, NiCad AAs may cut your running costs.
Date: Wed, 09 Dec 1998
From: "John F. Seman Jr." (102names@stratos.net)
>You can use the lithiums in the grip just not the AA lithiums?Comment on the AA lithiums, I have used them as sole source of power with 700si & VC-700 since camera and grip went on sale. Have had NO, repeat NO problems using these batteries. Life before replacing is greatly extended, the recycle time for built in flash is faster, even after extended use, as compared to new aklaline AA. And they seem to function much better than AKL AA's in cold weather. Don't know why Minolta is against their use, other than they would preclude the sale of AA nicad batteries & charger, at least to me for sure.
oHIo John
The 600si and 650si both accept a vertical grip, the VC-507 (VC-600 in UK). It is functionally identical to the VC-700. The Dynax 9 has the VC-9, which like the camera, is built extensively from stainless steel (and is hence very heavy). The VC-9 does not require you to remove the batteries in the camera and is equipped with a switch to allow you to select which set of installed batteries provides the power; it takes AA, 2CR5 or CR123A batteries.
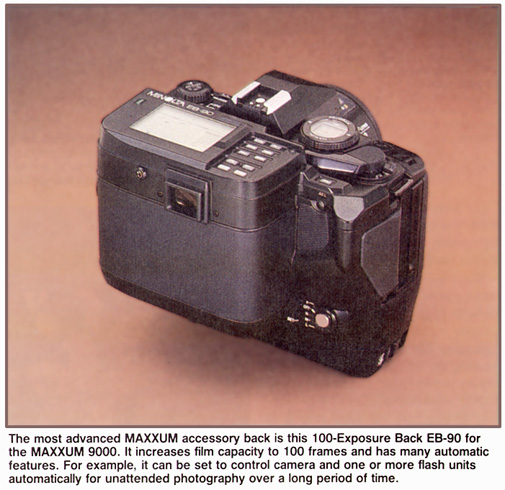
There was a special 100-exposure bulk film and invervalometer back made for the 9000 body, called the EB-90. They are very rare.